Mini Monets and Mommies

Monday, May 9, 2016

Work at Home Jobs: Changing for the Better?

So, you want to work at home. Who doesn’t? I mean you can sit around in your pj’s, watching TV, snacking and still make money – right? Um, not exactly.

Work from home


I’ve spent years in out-of-the-home jobs, and years as a work at home mom. I can say that I definitely like being a WAHM more (so much so that I sometimes have the occasional dream that I’m forced – for financial reasons – to find outside employment, and wake up in a cold sweat). Along with my blog, I have a patchwork of freelance and other at-home jobs that come together to make one income. Sometimes it’s pretty great, and sometimes it pretty much sucks. In either case, I do get questions on how, why and what I do. To answer those questions I recently wrote a book – Work at Home: A Guide to the Best Change You’ll Ever Make.
WAHM book
 

Not only does my new book answer all kinds of questions about working from home (where to start, how to plan, what finances do you need, how can you stay committed to working from home), but it also comes with printable worksheets to help the process along.

One of my favorite chapters covers persisting in the face of adversity. I know, some of you may have a job that lets you telecommute. Yay! Now, for those of you who are interesting in doing something such as blogging, freelance writing, design or authoring a book – it isn’t quite as easy. There will be rejections. It happens to everyone. There will be times when you feel like giving up. Again, it happens to everyone. In the ‘commitment’ chapter I list out some notable people who have overcome adversity and totally succeeded – in major ways.

Home office
 
Here’s a little sample from the chapter:

Think about all the people who have come before you – and not succeeded right away. Notice the phrasing, ‘not succeeded right away’. You’re not a failure. You’re a work in progress. And, you’re in very good company:

·        Dr. Seuss: He’s now one of the most recognizable (if not THE most) children’s authors of all times. But, he was rejected 27 times when he tried to get his first book published.

·        Elizabeth Blackwell: While you might know her name, she was the first female to receive an M.D. from an American medical school. That said, after applying to every medical school in New York and Philadelphia (along with 12 others in the northeast), she found herself almost entirely rejected. The only school that finally agreed to teach her only accepted her as a joke.

·        Jennifer Hudson: She’s won an Oscar, and an Academy Award. She’s won a Grammy, and many other accolades. But, she didn’t win American Idol. Good thing she didn’t stop after her first on-air loss.

·        Walt Disney: The Mickey Mouse maker opened his Laugh-O-Gram Films studio in Kansas City. Even though the films had some modest success, the studio went bankrupt.

·        The Beatles: In 1962 the not-yet-famous musicians auditioned for a contract with Decca Records – and were rejected!

·        Judy Blume: The famous writer spent two years only receiving rejections. She once said, “I still can’t look at a copy of Highlights without wincing” in response to their letter rejecting her with the possible reason of, “Does not win in competition with others.” Yikes!

·        J.K. Rowling: Harry Potter may be super-famous now. But, there was a time when the author got rejection after rejection. She even posted a rejection letter (for a book written under her pen name Robert Galbraith) on Twitter, saying, “U had nothing to lose and sometimes that makes you brave enough to try.”

·        Babe Ruth: The baseball icon struck out more than 1,300 times in his career. But, that never stopped him.

·        Oprah Winfrey: The talk show mega-star was fired from her first TV anchor job. Years later she is one of the most successful people in television.

·        Thomas Edison: Was his lightbulb successful on the first try? No way! It took the inventor more than 1,000 tries to get it right. Talk about commitment!

·        Steven Spielberg: The movie maker was rejected by the University of Southern California School of Cinematic Arts not once, but three times.

·        Vera Wang: The now-famous designer failed to make the 1968 Olympic figure-skating team. Lucky for clothes lovers everywhere. She turned her talents to the fashion world and became an editor at Vogue magazine – where she was passed over for editor-in-chief. That never stopped her!

·        Fred Astaire: Even though the entertainer was already a Broadway success, Astaire’s first screen test was a failure.

·        Beatrix Potter: Who didn’t read The Tale of Peter Rabbit as a young child? Well, many of us might not have if it hadn’t been for some very early-on self-publishing. After receiving a slew of rejections Potter decided to publish a handful of copies of her now-famous book on her own.

·        Mary Shelley: Her Frankenstein was initially rejected by every major publisher.

·        Margaret Mitchell: Before this bestseller (turned major movie) was published, this tale of the South was rejected 38 times.

·        Mary Kay Ash: This pioneering entrepreneur started her own company after being passed over (yet again) for a promotion.

·        James Dyson: The cyclonic vacuum leader didn’t have success on invention number one. It took thousands of versions before he got the ‘just right’ one.

·        Stephen King: How many rejections did He get prior to publishing Carrie? Thirty!

·        Madeleine L’Engle: Was A Wrinkle in Time a childhood favorite of yours? The classic book was rejected 26 times before being published.

·        Abraham Lincoln: He failed in business, failed plenty of times in politics and had a nervous breakdown. And, that’s all before becoming president.

·        Akio Morita: The name may not seem familiar. But, how about Sony? Morita co-founded Sony. While the notable company is big business now, its beginnings were built on a rice cooker. And, not just a rice cooker – but, one that burned the rice. Luckily Morita stayed committed and created much better products.

·        Harland Sanders: Aka Colonel Sanders. You may have grown up with KFC, but Sanders didn’t strike it rich right away. After opening up a cooked chicken-selling service station (at age 40!), he started working on his original recipe. At age 65 he sold his restaurant and was forced to live out of his car while trying to sell his chicken recipe. He received more than a thousand “no’s”, but kept on going – eventually building a fried chicken empire.

·        Henry Ford: The auto giant didn’t find his fortune on the first try. It took Ford two failed companies before one even worked.

·        Rowland H. Macy: You shop in his department store and watch the famous parade bearing his name. But, the retail mogul open (and failed at) four stores before getting it right.

Whew! Quite the list, isn’t it? What does it tell you? It should tell you that some of the most famous, on-top-of-their-games, noteworthy people in history and popular culture haven’t had it easy.

I’m kind of obsessed with this list. Don’t get me wrong – I’m not all about seeing other people fail. I want everyone (including YOU) to share in success. But, when that self-doubt creeps in, I take a look at this list and remind myself that it isn’t always easy.

There’s a whole lot of buzz out there about instant success. Whether it’s three steps to instant millions or how to become Internet famous overnight, it would seem like everyone is a winner. In reality, success (at least for the people on this list) takes hard work, commitment and the push that failure provides.
Work choices
 

When you feel like a failure, start to think twice about your choice or are low when it comes to commitment, remember -- this is completely normal. It’s part if the process that eventually will make you a success. If being your own boss, starting a business or working from home (and making a full-time living) was easy, wouldn’t every one do it?

If you enjoyed this, then check out the rest of my book Work at Home: A Guide to the Best Change You’ll Ever Make! And who knows, pretty soon you might be writing your own book from home too!

Friday, April 22, 2016

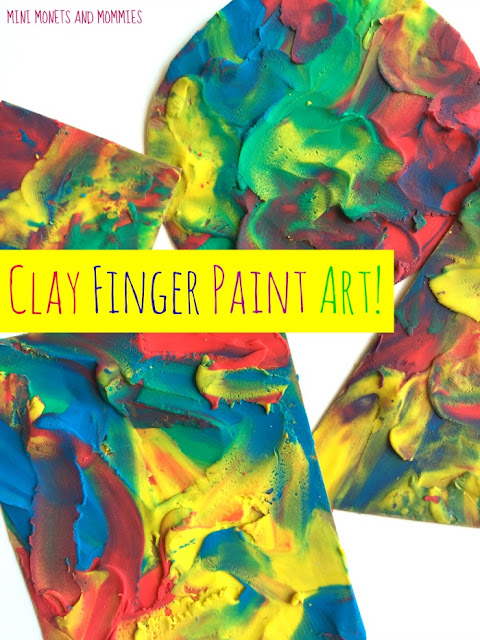
Kids Can Finger Paint with Clay: Shapes, Colors and More!

Finger painting with clay? That’s right! Why? Raise your hand if your child absolutely adored the ooey gooeyness of painting. Now raise your hand if you’re not exactly thrilled about the mess.

Kids' art

(This post contains affiliate links. Please see my disclosure statement for more information).

Okay, so we all have heard that messy play is good for kids. Not just good, but totally beneficial when it comes to encouraging creativity, inspiring imagination and even improving critical thinking skills. That said, sometimes we have to be practical. Let’s say you’re at grandma’s house for a week in the summer. The kiddos are begging to do a finger painting art activity. But, grandma’s white carpet or couldn’t-be-cleaner kitchen just can’t handle the splatters that are sure to ensue. What now? I have an answer that let’s your child ‘finger paint’ without actually using anything that’s a liquid.

I used to teach a preschool art class in a museum – entirely in the art galleries. If you think grandma freaks about getting teeny tiny droplets of tempera on her tile floor, imagine what the museum higher-ups thought about the prospect of having 3- to 5-year-olds making art in the same space as original Monet’s, Van Gogh’s and Pollock’s. Obviously, no paint was allowed. But, the kids always wanted to paint (and the parents always asked about it).

In order to get a paint-y feel, without actually making a mega mess, I swapped in soft modeling clay. The clay sticks to the paper underneath, and almost acts like actual finger paint (if it’s soft enough your child can mix colors, create textures and explore with lines/shapes). It’s also a tremendous fine motor workout!
Clay art

In the past we’ve done general exploration types of clay paints as well as famous artist-inspired ones. This time we’re adding some math (and a recycle/reuse theme). Instead of buying paper or board, have your child search the house for a cardboard source to reuse. Cereal and cracker boxes are great options. The cardboard is thick enough so that the clay doesn’t soak through, but thin enough that the kids can still cut it.

How does the math come into play? Your child is going to make her own geometric shapes to cover in clay paint! Use these instead of flash cards or ready-made products to learn shape names.

Here’s What You’ll Need:

·        Cardboard

·        Scissors

·        Markers

·        Soft modeling clay (in at least two different colors)

Here’s What to Do:

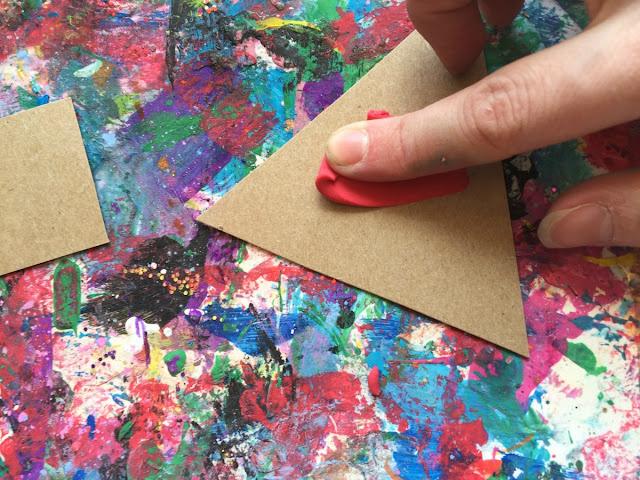
1. Draw shapes onto the cardboard. Your child can make them as small or large as she wants. The bigger the shape is, the more clay (and more work) it will take.
Recycled crafts

2. Pull the clay apart into pieces.
Clay Colors

3. Smooth the clay onto the cardboard, finger paint style. Your child can use her hands to mix the colors together, blending red and yellow into orange, red and blue into purple or yellow and blue into green.
Fingerpaint Clay

Clay project

Kids art

As your child works, she can layer the clay to make textures, uses her finger tips (or simple tools such as craft sticks) to make patterns/marks or add more colors.


Sunday, April 10, 2016

Let's Start Color Mixing! Kids' Art Activity

Color mixing. It’s one of the easiest kids’ art activities out there. That said, it’s also one of the best when it comes to grabbing your child’s natural sense of curiosity and helping her to explore.

Kids' art

(This post contains affiliate links. Please see my disclosure statement for more information).

Back when I used to teach children’s art classes, we only used the primary colors (and white). If the kids were making paper mache animals and wanted to paint an orange lion’s mane they had to mix yellow and red (and figure out how to get the orange color that they wanted by experimenting with different amounts of paint).

One of the biggest challenges of only using the primaries was actually getting the kids to mix the colors. They were all so used to having a rainbow of paints presented to them that they froze when only given a mere three or four. After some heavy encouragement, they would make the leap into mixing the colors. Within a few minutes, they were making discoveries and figuring out how to make their own new hues.

So, how can you start a color mixing activity at home? I always like to open the art-making with a few new vocabulary words. Depending on your child’s age she may or may not know the color words. If she doesn’t give her the words for blue, red and yellow – pointing to each color as you pour it out of the bottle. Next, add the words primary (blue, red and yellow) and secondary (orange, green and purple).
Painted colors

Keep in mind, you don’t always have to do a strict primary to secondary color-mixing lesson. You can use whatever colors your child feels like playing with. The idea here is for her to explore, experimenting with making new colors. Your child also doesn’t have to use a brush. She can use a brush. But, she can also use a sponge, cotton balls or her own hands.

To begin the color-mixing, here’s what you’ll need:

·        Tempera paint in at least three colors (you can also add white to lighten any color)

·        White paper

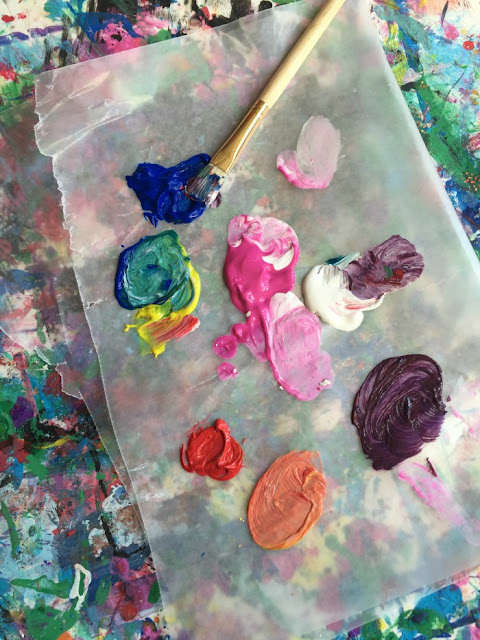
·        A palette (I like to use a sheet of wax paper – it’s simple, cost-effective and keeps the mess off of the table)

·        Optional: Paintbrushes, sponges, other painting tools

Here’s what to do:

1. Pour the paint onto the palette.
Kids' activities

2. Give your child a blank piece of paper.

3. Sit back and let your child mix away!
Process art
 
Color Mix
 

Use several sheets of paper, inviting your child to make as many different colors and designs as she can. As she’s working, ask her to name the colors. You can go completely realistic and stick to orange, purple, green, etc. Or, you can ask her to make up imaginatively silly names (such as ‘monstrous ghoulish green grey’).
Art projects

When your child feels comfortable mixing colors, start introducing this activity as part of the regular painting process. Whether she’s creating a spring tree, making a rainbow or painting a sculpture, she can mix up her own batch of colors – instead of asking you to buy them!

Are you looking for more artsy activities? Follow my Pinterest board for ideas.
Follow Mini Monets and Mommies's board Process Art for Kids on Pinterest.

Friday, March 25, 2016

How Can You Create Art Activities for Kids?

Where do all of my kids’ art activities come from? My head. Of course. But, what’s my process? Okay, I’ll share it with you!

Kids art


(This post contains affiliate links. Please see my disclosure statement for more information).

When I first started teaching children’s art classes I kind of didn’t know where to begin. I knew about child development. I knew about art processes. But, I didn’t really know how to create a ‘lesson’ (at least, not past mix these three colors together and let’s see what happens).

I remember kind of freaking out the first time that I taught summer art camp. During the school year the museum where I worked had some extremely solid programs that came with already-created lesson plans. I was in luck. Then the summer rolled around, and my boss handed out a ‘theme’ focus. Taking the topic and creating five days’ worth of activities for preschoolers wasn’t exactly easy. Even a decade later, it still isn’t easy.

Every time a friend or a parent comes to me with, “I just couldn’t come up with my own art activities for the kids. It’s just not something I’m good at.” I think about that very first summer. I think about how I tried (and totally failed) so many times to design thoughtful, developmentally appropriate, amazingly awesome art activities. I wanted to engage the littles, get them thinking, help them to explore art and most of all (hopefully) help them to learn a thing or two.

So, you say you want to start creating your own kids’ art activities? Whether it’s for the preschool class that you teach, your neighborhood playgroup or your own kids at home, you need to come up with your own process. For some (and I started out this way), it’s easiest to take an existing activity and make it your own. Add another few steps, swap out one material for another, change the size, add a texture, switch up the subject matter, use different colors, go from 2D to 3D or figure out some other way to make it slightly different, using the original as inspiration.

Okay, so you want to start totally from scratch. How? Well, we try to teach our kids using a hands-on approach. And, that’s what you can do – right now. Get hands-on, playing with art materials. Experiment with processes, let yourself be a kid again. Not only is this a great way to start thinking up some pretty exciting art projects, but it’s also majorly relaxing. Think about it, you get to take a break from work and stop stressing about your adult life. Playing with art (as an adult) reminds you of what it was like to be a carefree kid. So, take your time and enjoy it.

Here’s what I like to do when creating new activities…

I start with the materials. Sometimes just one or two that I want to focus on. Sometimes I spread out a buffet of materials, just to get myself thinking.

Process art
 
Occasionally I just sit in an open space (usually on the floor) with my favorite scrap foam core board. I use it as a mess barrier. But, now it’s so colorful it kind of inspires me.
Lesson planning
 

If I’m planning on a paint project I start mixing colors.

Paint process
 
Or, if I want to use another material, I just start exploring. I might spread some clay out on paper.
Clay activity


Tear up paper.

Collage paper


Pour out some glitter and glue.
Sparkle crafts

Pour some craft sand onto glue.

Colorful sand
Or, start mixing it all together.

Admittedly, the result makes much more of a process-oriented activity. Keep in mind, even process activities can be ‘planned’. This doesn’t mean that you direct the activity, just that you set up the framework. Doing the activity first (yourself) is extremely helpful. It helps you to help your child, and you can check out the process first to make sure that it actually works.

Are you looking for a few starter ideas? Check out our Pinterest board on process art for a few!
Follow Mini Monets and Mommies's board Process Art for Kids on Pinterest.

Wednesday, March 23, 2016

Colorful Cupcake Math for Kids! Really!

What do cupcakes and math have in common? Nothing, you say? Well, maybe they might just have a few things in common – I mean beyond measuring ingredients to make them.

Cupcake crafts


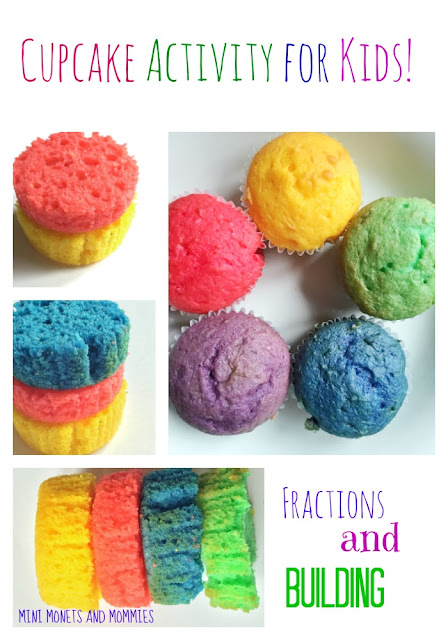
With a few drops of food coloring you can bake up a batch of rainbow cupcakes. Yes, they’re upper-tasty to eat. But, there’s so much more that you can do with them (before eating them, of course). You can use them to build your child’s fine motor skills, learn about colors, better understand fractions and explore engineering! And, don't forget the sensory aspect. Not only do they smell delicious, but they also feel pretty awesome. Take a look at the photos of ours and you'll see just how much the cupcake slices mimic sponges.

Cupcake project
So, go ahead and make math tasty and get creative with cupcakes.

Here’s What You’ll Need:

·        White cupcake mix (There’s no shame in using boxed mix. Sure, your own homemade recipe may be fab. But, if you’re not the best baker, go ahead and use the one from a box)

·        Food coloring – Try using just the three primary colors (red, yellow and blue) to add in a color-mixing lesson.


Here’s What to Do:

1. Mix up the cupcake batter.

2. Divide the batter into three or more bowls.

3. Add two to three drops of food coloring into each bowl. Your child may notice that the color turns lighter as you mix. Ask her why she thinks this is happening (hint: Ask her what color the batter is). If you don’t have a rainbow of hues on hand, mix the primary colors to make the secondaries (orange, purple and green).

4. Pour the batter into a cupcake tin and bake (follow the directions on the box/recipe).

5. Let the cupcakes cool completely.

6. Slice the cupcakes into pieces. Cut a whole slice, and then make halves, fourths or thirds.

Kids' cupcakes
Now it’s time to explore! If you want to work with fractions your child can build on a whole cupcake base. Add a quarter, or half on top. Then add and subtract ‘pie’ pieces.

Colorful crafts
If your child wants to experiment with engineering, have her build a tower, a wall or whatever type of structure she wants.

Math project
When you’re all done with the math, your child can eat the pieces! Not all at the same time though, of course.

Are you looking for more kids’ activities? Follow our Pinterest board for ideas!
Follow Mini Monets and Mommies's board Creative Kids Crafts on Pinterest.

Thursday, March 17, 2016

Spring Showers and Flowers Kids' Art Activity

April showers bring May flowers – right? If you’re looking for a spring themed kids’ art activity, I’ve got a paint and clay exploration for you!

Spring art

This post contains affiliate links. please see my disclosure statement for more information.

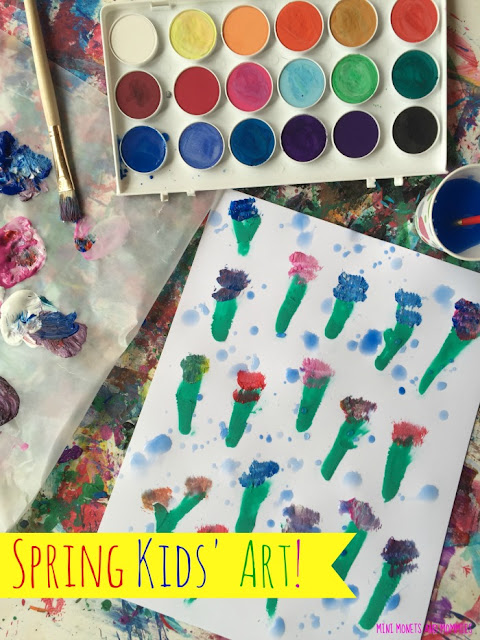
This started as a simple piece of pattern play, with clay of course. It grew into a multi-media project. Your child can explore two kinds of paint, color-mixing and much more.

What can this art exploration help your child to learn (or how can it help her to develop)? Obviously, it focuses on spring plants (so, that’s some science for her). After creating flowers, your child will add ‘rain’. Use this opportunity as a way to introduce the plant growing cycle (including what a plant needs to grow – such as rain).

The color-mixing aspect also ties in science as well. The ‘finger paint’ clay process is an easy way to build fine motor skills, as is playing with different types of paintbrushes (thick and thin). If your child chooses, she can create a pattern with the spring flowers she’s making. Use this as a math activity, helping your child to understand what a pattern is and counting the blooms.
Kids' art

Keep in mind, your child’s artwork doesn’t have to look exactly like what’s pictured here. Encourage her to explore, experiment and make her own discoveries within the materials given and the processes used!

Here’s What You’ll Need:

·        White paper

·        Green modeling clay (make sure that it’s soft)

·        Tempera paint (choose as many or as few colors as you want – you can also just go with the primaries)

·        Blue water color paint

·        Thick and thin paintbrushes

Here’s What to Do:

1. Tear dime-sized pieces of clay apart. Press the clay onto the paper, ‘finger painting’ flower stems. Your child can make the same motion as she would if she was actually painting with her hands. Soft clay will easily spread and stick onto the paper.
Kids' crafts

2. Pour a few quarter-sized pools of tempera paint onto a piece of wax paper (it’s a simple, and affordable, palette).

3. Mix the colors into new ones.
Tempera Paint

4. Choose a paintbrush (or your child can use her fingers). Dab different colors of paint onto the flower stems.
Kids' art

5. Make it rain! Wet another paintbrush. Dip it into blue water color paint.


6. Sprinkle the water color paint over the flowers to create rain, splattering it like a Jackson Pollock artwork! Your child needs to keep adding more water and paint to the brush as she goes along.
Flower painting

Are you looking for more kids’ art activities? Follow our Pinterest board for ideas!
Follow Mini Monets and Mommies's board Creative Kids Crafts on Pinterest.

Sunday, March 13, 2016

Gummy Bear Picture Frame Kids' Craft

Ah, the gummy bear! Who would have thought that you could use this tasty candy treat for a cute kids’ art activity? And a DIY picture frame nonetheless? Well, you can.
 
Picture Frame

(This post contains affiliate links. Please see my disclosure statement for more information).

I’m a fan of eating the squishy little bears. That said, sometimes I forget that I bought a bag while walking the aisles of Target (I meant to get cat food, towels and an air freshener, but somehow ended up with a cart filled with things like candy). The forgotten bears go from sweetly soft and chewy to rock hard – making them completely inedible. Now what?

Take your stale gummy candy and turn it into this crafty little picture frame! Add the frame to your child’s room décor or gift it to a friend or family member (it’s an easy holiday present for grandma or a fun end of the school year gift for teacher). As a bonus, this frame isn’t just an artsy gift. It helps your child work on fine motor skills such as eye-hand coordination and dexterity, color recognition and sorting (she’ll match colors with bears and glitter later on – if you want to add this step).

Keep your child’s creativity in mind while creating this craft. That means she doesn’t have to make her frame to look exactly like we did. Does she want to add more bears? Ok! Maybe she wants to use a different color pattern? Great! What happens if she wants to position the bears in a different way, use only one color or glue on just three bears? That’s fine too. The picture frame tutorial simple present the basic how-to steps. Take it from there and let your child make the project her own.

Here’s What You’ll Need:

·        4 thick craft sticks

·        Clear-drying glue (we used both school glue and tacky glue)

·        Gummy bears

·        Wax paper

·        Glitter (in colors that match the bears)

Here’s What to Do:

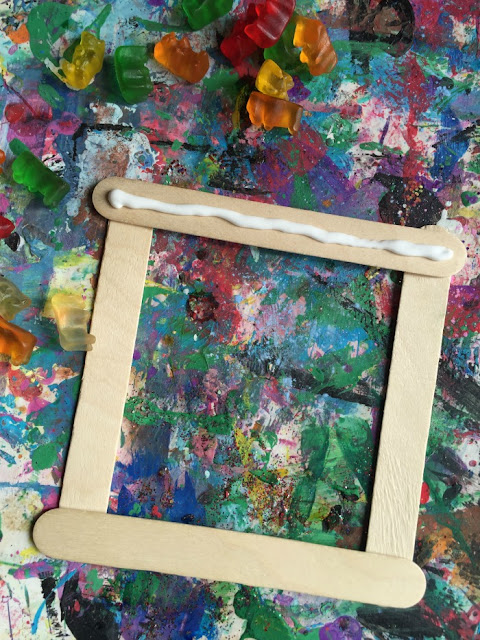
1. Position the craft stick in a square shape.

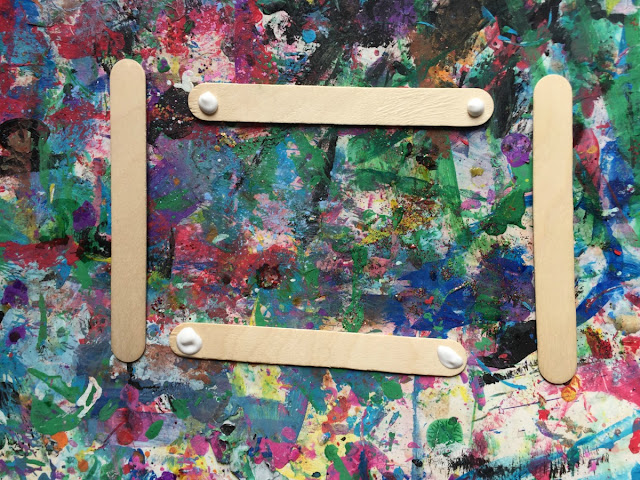
2. Dot glue on the ends of the top and bottom sticks.
Craft sticks

3. Press the side sticks on to complete the frame shape.
Craft stick

4. Draw a line of glue along the craft stick.
Kids' crafts

5. Line up the bears, pressing them into the glue.

6. Repeat for one or more of the other sides.
Gummy bear

7. Optional: Create glitter gummy bears. Pour a quarter-sized pool of school glue onto wax paper. Give the bears a bath in the glue.

Kid's art


Sprinkle the glitter on top of each one, matching the glitter color to the bear’s color. Let the glitter-bears dry.
Sparkle craft

8. Glue the glitter guys onto the frame too!
Candy glitter

When the frame’s dry, tape a photo or one of your child’s drawings to the back. You can prop up the frame or attach magnetic strips to the back, turning it into a fridge magnet.

Are you looking for more kids’ crafts? Follow our Pinterest board for ideas!
Follow Mini Monets and Mommies's board Creative Kids Crafts on Pinterest.