Mini Monets and Mommies

Friday, May 15, 2015

Pipe Cleaner Art Activity: Flower Sculptures

Pipe cleaner art activities have been on the agenda lately. There have been pipe cleaner flowers and gift baskets made with the bendy craft material. We’re going back to the flower art, but with a twist this time -- making a soft sculpture.

Art activity

A few weeks ago a bought a mega-stock of thick craft sticks. I usually reuse popsicle sticks, but being that it’s only spring – I haven’t been buying summer-time treats. So, instead of a random few leftover sticks, I now have a giant bag of them. What to do? Last week the craft sticks became caterpillars (which then became butterflies!). This week I’m going back to the flower idea.

This is an easy kids’ art activity that has almost no mess (unless the cat gets ahold of the pipe cleaner pack – then you’re in trouble). It also works out your child’s fine motor skills in a relatively stress free way. The looping and twisting motions require eye-hand coordination, but aren’t so intricate that your child will easily frustrate. You can also do this craft almost anywhere. Pack up the materials in a bag and take them off to the park for some outdoor art-making or bring them on a trip away from home (grandma will probably appreciate the less-mess pipe cleaners over finger paints and glitter).

And now on to the art...

Here’s What You’ll Need:

·        Pipe cleaners

·        Craft sticks

Here’s What to Do:

1.     Wrap a green pipe cleaner around the craft stick, starting at the bottom. Your child will likely need several of them to cover the stick completely.
 
Pipe cleaner

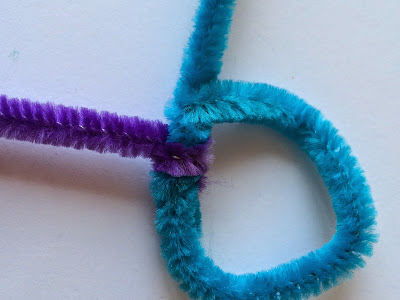
2.     Bend a pipe cleaner into a loop.
 
Fine Motor

3.     Wind another pipe cleaner around the first.
Kids' art

4.     Make a loop, twist it (your child is now making the flower petals) and repeat.
 
Kids' crafts

5.     Keep on repeating with different colors to make more petals.
 
Children's art

6.     Twist the end of the flower around the top of the green stem.
 
Kids' crafts

7.     Curve, bend and twist another green pipe cleaner around the stem to make leaves.

And that’s it!!! Your child has a flower sculpture.
Spring activity

Are you looking for more creative kids’ crafts? Follow my Pinterest board for ideas!
Follow Mini Monets and Mommies's board Creative Kids Crafts on Pinterest.

Tuesday, May 12, 2015

Model Magic Letter Art for Kids

Model Magic plus an easy art activity can equal learning letters for your child. How? I love the clayish compound. I tried to sneak it in to just about every project that we made when I taught art classes and camps. With my own son, I would let him play with the stuff for what seemed like hours. He never really liked making ‘something’ with it. He just enjoyed molding and modeling it. If you’ve never used it, imagine what would happen if a marshmallow and modeling clay got married and had a baby. That’s Model Magic.
Letter project

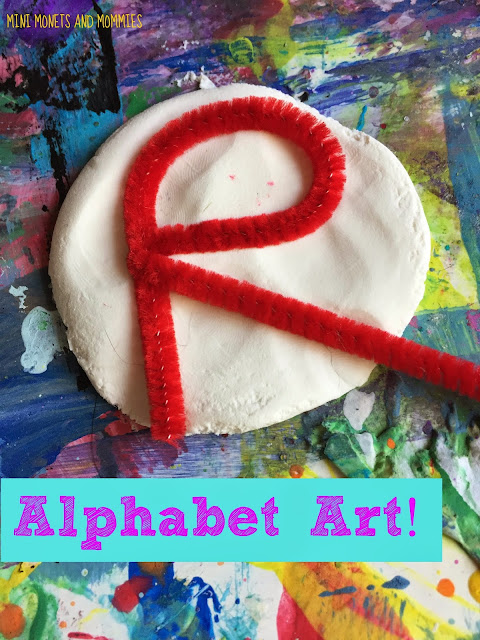
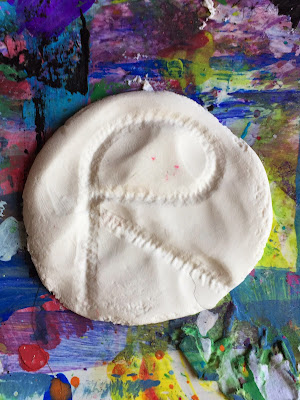
So, what does this have to do with learning letters? While I’m all for playing and exploring with the sculpty stuff, your child can also use it to make letter imprint art. This is super-easy and helps your child to create his own letters (in a way that’s different from drawing). Make one of these little letter imprints or create an entire alphabet. Your child can then puzzle the pieces together to make words!

Here’s What You’ll Need:

·        Model Magic – Just the plain white stuff.

·        Pipe cleaners

·        Tempera paint

·        A paintbrush

Here’s What to Do:

1.     Bend the pipe cleaner into a letter shape.

2.     Roll the Model Magic into a ball.
 
Sculpture crafts

3.     Press the ball flat. Your child can use her palm to do this.
 
Clay Ball

4.     Press the pipe cleaner letter into the top of the clay compound.

5.     Peel the pipe cleaner off.
 
Alphabet craft

6.     Paint the surface with tempers. Your child can also add a second color in the pipe cleaner imprint. This highlights the letter.
 
Letter Art
 
Kids' art

If you leave the letter out, the Model Magic will eventually dry and harden. These little imprints allow your child to feel the letter, and not just see it. Have your child pick up and touch each piece of alphabet art. Ask what the letter is and what sound it makes. Move on to another letter or combine them.

Are you looking for more letter art? Follow my Pinterest board for ideas!
Follow Mini Monets and Mommies's board Letter and Literacy Kids' Crafts on Pinterest.

Monday, May 11, 2015

Share a Coke Summer Gift Baskets

This shop has been compensated by Collective Bias, Inc. and its advertiser. All opinions are mine alone. #ShareMemories #CollectiveBias 

Gift basket
 
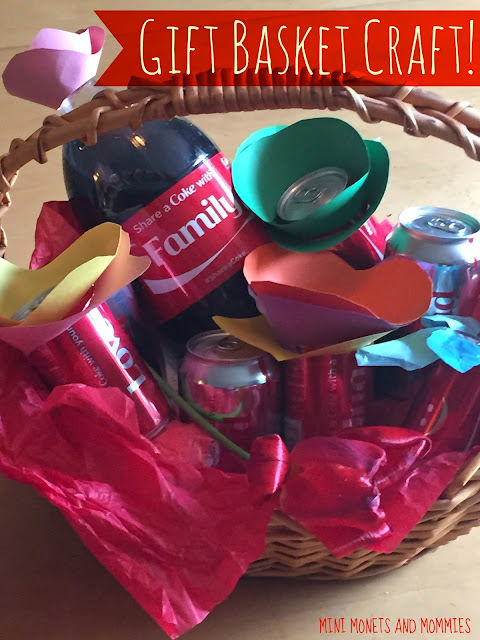
Between Mother’s Day and Father’s Day, I always feel swamped finding the ‘right’ gifts. While I’ll gladly let my husband shuttle our son off to the mall to pick out a present for me—I’m still in charge of one grandmother, two grandfathers and one husband/dad to shop for. After years of kind-of generic-seeming gifts, we’re trying something different this year. We’re making our own flower-filled gift baskets – to 'Share a Coke'!

“Sharing a Coke?” you ask. Yep, that’s what I said. My 13-year-old and I were doing our usual weekly trip to Giant Eagle, when he (again) begged me to buy soda. We’re usually I milk, juice and water house, but I do buy the occasional soda as a treat. Given that there were some special holidays coming up, we decided on the new “Share a Coke” mini-cans and bottles. Why? Along with bottles that come with actual names on them, these Coke’s also have cute little ‘names’ on them such as Dad, Mom, BFF, Love and much, much more. We picked out a few for grandma and a few for grandpa. This is the first year that my parents have been in town (and not traveling overseas) for both Mother’s Day and Father’s Day. When I told my son about making a Coke-filled flower gift basket for grandma and grandpa, he was all in. Truthfully, I think he was hoping that they would share their Coke with him (after he shared it with them!).
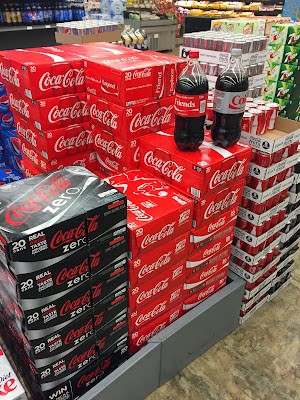
Coke Drinks
 
First up was a Mother’s Day basket for grandma. My son dressed up the bottle and cans in paper flowers.

Here’s What You’ll Need:

·        Construction paper

·        Scissors

·        A marker

·        Tissue paper

·        A basket

·        Clear tape

Here’s What to Do:

1.     Draw a bumpy circle onto a piece of colorful paper.

2.     Cut the shape out.

Mother's Day

3.     Cut a spiral shape into the circle, starting at the outside and moving inward.

4.     Wrap the paper around the top of the bottle or can to create a flower bloom.

5.     Tape the ends of the flower.

6.     Optional:  Add another color on to make a two-toned flower.

7.     Fill the bottom and sides of the basket with tissue paper.

8.     Add the bouquet of Coke flowers.

Paper flowers
 
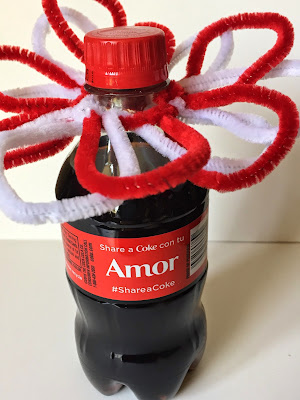
Grandma is super into gardening, so we crafted some pipe cleaner flower Coke’s.

Here’s What You’ll Need:

·        Pipe cleaners

·        Tissue paper

·        A basket

·        Optional: A potted plant

Here’s What to Do:

1.     Bend a pipe cleaner into a loop. Loosely tie it together at the end (you’ll need to untie it later, so don’t wind it too tightly).

2.     Wind another pipe cleaner around the first. Make a loop.

3.     Continue doing this to make loop-like flower petals. Add more pipe cleaner petals as you go.

4.     Untie the main loop.

5.     Fit the pipe cleaner around the Coke bottle’s neck (just under the cap).

6.     Tie the ends together.

Flower art
 
7.     Put the Coke flowers into a tissue filled basket.

8.     Optional: Add the faux flowers to some real ones. Fit them into a pretty potted planter!

Flower crafts


Now for dad/grandpa. We stayed with the garden theme, but made it a bit manlier.

Here’s What You’ll Need:

·        A box-style gift basket

·        Green tissue paper

·        Small potted seedlings (start these before Father’s Day- you can still give them to dad even if they haven’t sprouted yet).

·        Faux moss—You can find this at most craft stores.

·        Clear drying-school glue

·        Scissors

Here’s What to Do:

1.     Cut and glue the faux moss around the top edge of the gift box. We used a roll (it looks almost like ribbon), but you can use bulk faux moss instead.

2.     Fill the bottom with green tissue.

3.     Add in the potted seedlings.

4.     Place the ‘Share a Coke’ cans around the plants to show how your love for dad grows!

Kids' crafts

These Coke-themed flower gift baskets are sure to make memorable occasions. Mom and dad can plant the seedlings or save the paper and pipe cleaner flowers as keepsakes from these cute gifts.

Now that we’ve showed you how we shared Coke for Mother’s Day and Father’s Day, let us know how you’ll create summer memories with your family? Add a comment below to tell us about your Mother’s day and Father’s Day plans!

Saturday, May 9, 2015

Butterfly Life Cycle Kids' Art Activity

The butterfly life cycle is a favorite when it comes to kids’ science themes. In my other-then-blogging job, I spend a lot (I mean a lot) of time talking to preschool teachers about their science and art lesson plans. I would say that a good 98 percent do some sort of life cycle project at some point (usually the spring) during the school year. Whether you’re a teacher, mom or dad—you can get artsy with the child in your life, creating this caterpillar to butterfly kids’ craft!
Science project

We’ve done those circular drawings with the arrows pointing from stage to stage since my son could pick up a pencil. So, after years of doing drawings I thought, “Why not try something a bit different?”. This is super-simple, and so much fun.

And, on to the art-making…

Here’s What You’ll Need:

·        Thick craft sticks

·        Model Magic

·        Clear-drying school glue

·        Googley eyes

·        Pipe cleaners

·        A marker

·        Scissors

Here’s What to Do:

1.     Wrap a few different pipe cleaners sound the craft stick. Start at the bottom, leaving a little room for the caterpillar’s head.

2.     Continue wrapping until your child covers the whole stick.

Kids' crafts
 
3.     Roll a piece of Model Magic into a ball.

4.     Press the ball onto the top part of the craft stick, making a head. If it doesn’t stick on its own, your child can dab a dot of glue under it.

5.     Glue on two googley eyes and draw a mouth with the marker.

6.     Cut a pipe cleaner into thirds. Bend it into a ‘V’ shape. Glue the bottom of the “V’ to the back of the caterpillar’s head to make antennas.

Pipe cleaner art

Life Cycle
 
Your child has a caterpillar! Now it’s time to grow into a butterfly. Wrap it up in tissue paper to make a chrysalis.


Kids' art

Now the caterpillar can turn into a butterfly…

Here’s What You’ll Need:

·        The caterpillar craft

·        Clear-drying school glue

·        Craft feathers

Here’s What to Do:

1.     Position the craft stick vertically.

2.     Dot glue onto the back of the craft stick.

3.     Press craft feathers onto the glue to make wings.
 
Kids' crafts

The caterpillar has now magically transformed into a butterfly and your child has gotten to explore the life cycle.

Are you looking for more kids’ crafts? Follow my Pinterest board for ideas!
Follow Mini Monets and Mommies's board Creative Kids Crafts on Pinterest.

Monday, May 4, 2015

Mother's Day Crafts for Kids: DIY Wallet

My son has never been one for Mother’s Day crafts. He made the obligatory handprint, “Mommy I love you” clay plaque in kindergarten and the handprint hearts in preschool. But, when he didn’t have a teacher standing over him, he stopped crafting cute little gifts for me. So, when he was in sixth grade (for those of you who only have little kids, by middle school the handmade creations are nixed by teachers) he went shopping with my husband for a gift. He got to pick anything he wanted – which apparently was a day-glow peach wallet that was actually somewhat bigger than the teeny tiny purse I usually carried.

Kids' art

Not that I don’t adore anything my son picks out (yes, I still carry the wallet with me – just in a much bigger purse), but I’m kind of partial to the DIY Mother’s Day gifts. I’m also partial to ‘no-sew’ kids’ projects. Combining the wallet idea with no-sew crafting, I got an artsy little activity. If your child is still into all things crafty, try this out. It’s simple enough for a preschooler to create, and helps to build fine motor skills!

Here’s What You’ll Need:

·        Craft foam

·        A hole punch

·        Yarn

·        Scissors

·        Clear-drying school glue

·        Craft felt

·        A marker

·        Optional: Self-adhesive velcro

Here’s What to Do:

1.     Cut the craft foam to the size that you and your child choose. Remember, your child will be folding this in half. Size it so that it is twice as large as your child wants to make the wallet.

2.     Fold the foam in half.
 
Kids' crafts

3.     Punch holes along the top half of the foam.
 
Mother's Day

4.     Mark the holes through to the bottom half with a marker.
 
Children's crafts

5.     Punch matching holes.
 
Lacing Art

6.     Repeat for the other side.

7.     Cut two pieces of yarn.

8.     Thread the yarn through the bottom set of holes on one side. Help your child to tie it in a knot. Have him ‘sew’ the yarn through all of the holes.

9.     Repeat on the other side, and secure the yarn at the tops with knots.
 
Lacing Activity

10. Create a design on the front of the wallet with felt shapes. Your child can cut out the felt and glue it onto the foam.
 
Flower art

11. Optional: Press self-adhesive velcro onto the inside top of the foam to make a seal for the wallet.
 
Wallet Activity

Are you looking for more kids’ Mother’s Day crafts? Follow my Pinterest board for ideas!
Follow Mini Monets and Mommies's board Mother's Day Crafts for Kids on Pinterest.